
On-boarding VMware Horizon View Instant-Clone VDI Pools into Microsoft Defender Advanced Threat Protection.
If you’re wanting to utilise Microsoft Defender Advanced Threat Protection within your VMware instant clone environment you might find the guidance provided to you isn’t working.
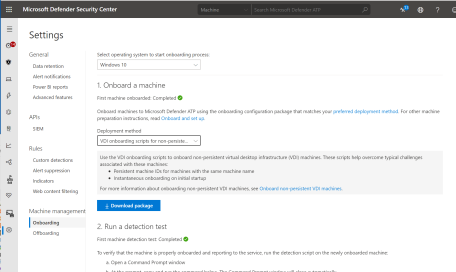
When selecting the “VDI onboarding script for non-persistent machines” option from the Microsoft Defender Security Center, you are provided with this url for guidance.
The guidance states that in order to onboard your non-persistent machines you need to first copy the scripts locally onto the gold master image, then configure a gpo to run the script at start up.
This is all well and good if you’re running linked clones which have a traditional machine start up process but with instant clones the cp-parent is already running when the cloning takes place. Meaning an instant clone machine will never “start up” and call the group policy.
To get around this you can utilise a ClonePrep script which runs during the customisation phase of the provisioning process. My ClonePrep script is a simple .bat file which calls the onboarding script. The bat file contains:
PowerShell -NoProfile -ExecutionPolicy Bypass -Command "& 'C:\Windows\System32\GroupPolicy\Machine\Scripts\Startup\Onboard-NonPersistentMachine.ps1'"Create the ClonePrep.bat file on the gold master image and reference the location in the pool settings under Guest Customization, Post-Synchronisation script name:
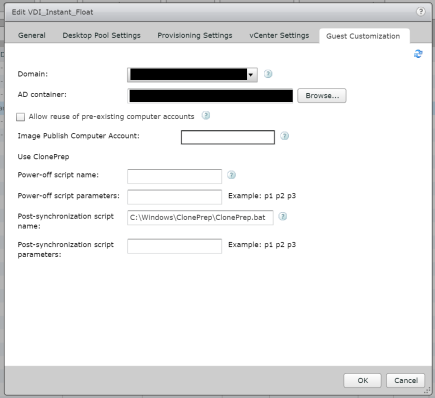
Pool settings to include the ClonePrep script. I also had to extend the ClonePrep timeout value to 40 seconds to ensure the script had time to run. This can be done by changing the following registry setting in your gold master image:
Key: HKEY_LOCAL_MACHINE\SYSTEM\CurrentControlSet\services\vmware-viewcomposer-ga

Value Name: ExecScriptTimeout
Value Type: REG_DWORD
Value Data: 9c40
You can enter this in hexadecimal or decimal. The value is represented in milliseconds.
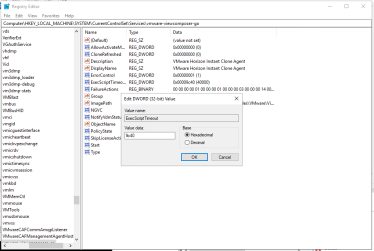
Registry settings to extend the ClonePrep timeout value.
Tip: If you’re using the VMware OS >Optimisation Tool (and you should be) you >might find a couple of the optimisations it does stop ATP working correctly.
First the “Connected User Experiences and Telemetry” service will have been disabled. Ensure the start up type is changed to “automatic”.
You’ll also need to change the following registry keys:
HKEY_LOCAL_MACHINE\SOFTWARE\Policies\Microsoft\Windows Defender\DisableAntiSpyware = 0

HKEY_LOCAL_MACHINE\SYSTEM\CurrentControlSet\Services\WinDefend\Start = 2
Once you’ve made the changes, push your new image to the pool and you should find your machines are now appearing in the Microsoft Defender Security Center portal shortly after creation.
If you have a different way of doing this please let me know! you can find all my details on the about page!